So, I’m a huge fan of the show “My Little Pony: Friendship is Magic”, I watched it as a teen and rewatched it as an adult when I was going through some hard time.
If you know the show, you might know it was created in Adobe Flash, where it was pretty much a pixel perfect cartoon.
And, you might know that on an iPhone, since iOS 17, with subject recognition, you can turn any subject/object into a sticker.
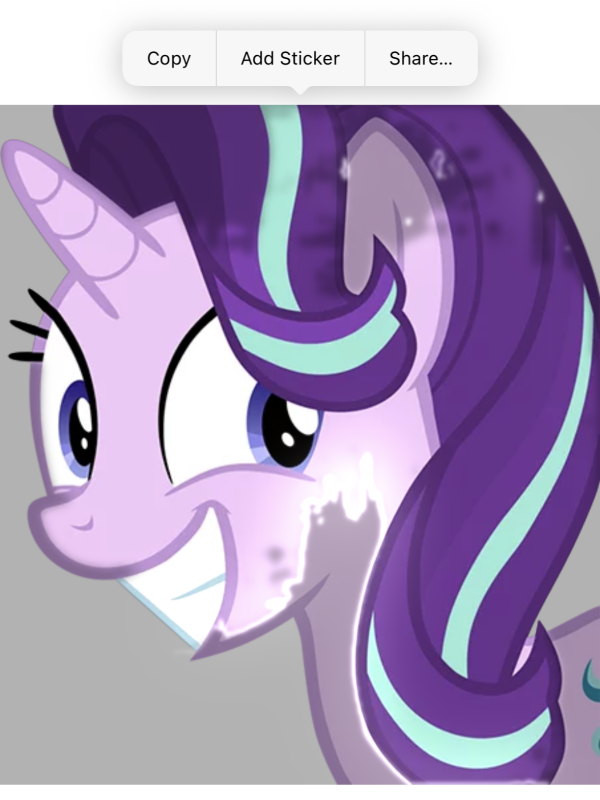
What does this have to do with image restoration (and avoiding AI to do so)? Well, let’s take this particular image as an example:

It may look like a good rendition of Starlight Glimmer, but this image is actually compressed with WebP, which means there are many compression artifacts when we move closer:

Now, if we try to create a sticker from our source image, iOS will fail terribly in the subject recognition as it gets thrown off by the compression:
Sidenote: This actually used to work with iOS 17 early on when the feature was released but Apple must have changed something in the algorithm so it gets thrown off these days.
So, I thought to myself: The easiest solution would be to simply uncompress the image and remove the artifacts, right?
Of course, in today’s age other people might turn to AI for this, but I think I can do without for now using what’s known as a brain (and knowledge). :P
Primer on Lossy, Lossless, GIF and dithering
You may already know that formats like WebP and JPEG are what’s known as “lossy”, meaning pixels and color information aren’t stored 1:1 as is, but rather an approximation is stored to represent something “that looks mostly like the original but isn’t” to save space. In the case of JPEG, if I recall correctly, an image is divided into 8×8 pixel blocks, meaning you got squares of 64 pixels, and then shapes are recognized and a mathematical formula to draw that shape is stored instead of each pixel information.
In the case of PNG and GIF on the other hand, these are lossless, where each pixel and color information is stored “as is”. Wait, what was that? GIF IS LOSSLESS?! Yes, that’s right, GIF is lossless, so now you might ask “why does it look like crap, then?”, well that’s simple: GIF is limited to a “color palette” of 256 colors. So, as long as you don’t have to store more than 256 colors, GIF is great and will store every pixel and color information “as is”. This is great for logos, simple flat cartoons etc.
Then how come we can store “more” than 256 colors for those animated GIFs? Well, we can’t, actually. But there’s a technique known as dithering, which was also used in early game consoles albeit drawn by hand by skilled artists: We take the limited colors and cleverly blend them together to create the illusion of more colors.
But what does that have to do with restoring an image vector?!
Well, here’s my thought: What if we do the reverse to clean up the raster image first? What if we encode something as say, a GIF, but we force a limited color palette, and force that *no* dithering is done… shouldn’t that at least in theory give us a perfect, compression-artifact-free restoration of a cartoon?
ImageMagick
If you’re from the UNIX world you likely already know ImageMagick and probably use it for image processing in a terminal using the convert command.
Let’s first try to just turn the WebP into a GIF with ImageMagick to see what happens, without any special anything:
convert Starlight_Glimmer_Grin_Compressed.WEBP starlight_gif.gif
As we can see, ImageMagick actually kept the compression artifacts and used dithering to try to re-create the artifacts! Of course, we don’t want that…
What if now tell ImageMagick not to dither at all?
convert Starlight_Glimmer_Grin_Compressed.WEBP -dither None starlight_gif_nodither.gif
This looks slightly cleaner, but it’s still not perfect… there are too many colors! What if we do something crazy and simply try our luck, and limit the GIF to simply use 16 colors only?
convert Starlight_Glimmer_Grin_Compressed.WEBP -colors 16 -dither None starlight_16c_nodither.gif
Yikes! Now that really does look like a bad GIF. The issue here, of course, was expected because the program does not know which colors are the real ones, and which colors are from artifacts, it simply tries to limit the palette to 16 colors without any guidance… but we can fix that!
Color Palettes!
We simply have to create a color palette, where we define which colors are OK to use, such that ImageMagick will be forced to pick a color closest in the palette which should, in theory, get rid of all compression artifacts.
But how do we create a palette? We, can use ImageMagick for this too.
Let’s say we want a palette with exactly 3 colors, specifically Red, Green and Blue. Since we’re operating in 8-bit RGB space, the values for these 3 colors are 0xFF0000, 0x00FF00 and 0x0000FF. So we tell ImageMagick to create a palette of those 3 colors, which will give us 3 pixels, one for each color:
convert xc:"#ff0000" xc:"#00ff00" xc:"#0000ff" +append palette.pngNow, I would show you the resulting palette but it’s 3px wide 1px high! So instead I have to show you the file with its thumbnail on macOS:

How can we apply that palette to our image (oh god oh fuck why would I even try that, no, I can feel it like a train going at full speed into a terrible GIF and nothing can stop it!)
convert Starlight_Glimmer_Grin_Compressed.WEBP -remap palette.png starlight_cursed.gif
As we can see, it worked, but there are a few issues: It’s still using dithering, and we forgot an alpha channel! There is no transparency! We have to regenerate our palette to allow for transparency as well:
convert xc:"none" xc:"#ff0000" xc:"#00ff00" xc:"#0000ff" +append palette.png
And perhaps it wouldn’t hurt to add black, too!
convert xc:"none" xc:"#000000" xc:"#ff0000" xc:"#00ff00" xc:"#0000ff" +append palette.png
convert Starlight_Glimmer_Grin_Compressed.WEBP -remap palette.png starlight_cursed_rgba_black.gif
Now, what does it look like if we were to disable dithering at this stage with our very limited color map?
convert Starlight_Glimmer_Grin_Compressed.WEBP -dither None -remap palette.png starlight_cursed_rgba_black_nodither.gif
Thanks to our purposefully limited color palette or Red, Green, Blue, Black and Alpha we can really see the difference between dithering (trying to simulate more colors) and this new result where dithering is disabled and things become “this or nothing”.
I think this actually helps us visualize compression artifacts, too! Why are there spots of red in the eye, where I as a human do not see any red? I do not know, perhaps those are artifacts from the WebP compression which we would normally not notice. And perhaps this is the sort of thing an object recognition engine might see.
Intermixing color limitation with remapping
But here’s where things get odd, and I don’t have an explanation for, and perhaps one of my readers knows the answer, what if we take our palette which is already limited to 5 colors, but tell ImageMagick that it should limit the color palette to 16 colors? Or limiting it to 5 colors? For some reason that actually changes the result and I don’t know why. Perhaps that’s a quirk of the GIF specification itself or a bug in ImageMagick, or a feature I don’t understand:
convert Starlight_Glimmer_Grin_Compressed.WEBP -colors 16 -dither None -remap palette.png starlight_cursed_rgba_black_nodither_16c.gif
Hmmmmmm, now that I think about it, remember our earlier example where I explained that limiting it to 16 colors will try to calculate the best match? Perhaps ImageMagick will first do the limitation/recalculation to the 16 best colors *before* doing the remapping; it would explain why it looks cleaner now and those random “reds” in the eye are now gone.
We can actually try to test the theory: Let’s limit it to 5 colors now:
convert Starlight_Glimmer_Grin_Compressed.WEBP -colors 5 -dither None -remap palette.png starlight_cursed_rgba_black_nodither_5c.gif
Now, to try to better understand this result, let’s take our original image and let ImageMagick do 5 colors without our own color palette, that is to say, it should pick its own 5 colors:
convert Starlight_Glimmer_Grin_Compressed.WEBP -colors 5 -dither None starlight_nodither_5c.gif
Exploring ImageMagick’s internal color computations
Hm, I wonder if the alpha channel even counts as a color for this computation… this would be an important detail to know before we process our image further:
convert Starlight_Glimmer_Grin_Compressed.WEBP -colors 1 -dither None starlight_nodither_1c.gifAaaand the result is a not-so-noteworthy completely transparent GIF:

Setting it to two colors will just give me transparent and bright purple; so yes, the alpha in itself counts as a color for this computation:
convert Starlight_Glimmer_Grin_Compressed.WEBP -colors 2 -dither None starlight_nodither_2c.gif
This actually gave me an idea; I could probably create a mask palette of black and alpha to create a nice mask, but there’s of course a chance that it would approximate some lighter colors to alpha rather than to black… let’s try!
convert xc:"none" xc:"#000000" +append mask.png
convert Starlight_Glimmer_Grin_Compressed.WEBP -colors 2 -dither None -remap mask.png starlight_nodither_2c_ba.gif
Aaaand it’s black. Hm. What if we first recalculate 16 colors and then apply our black and alpha mask?
convert Starlight_Glimmer_Grin_Compressed.WEBP -colors 16 -dither None -remap mask.png starlight_nodither_16c_ba.gif
Oh wow! A near perfect crop, without even needing Photoshop’s AI object recognition cropping thingy tool! :D
Sidenote: Dithering/No dither made no visual difference in this example. In fact, it produces a binary identical output (verified with SHA256).
Ok, I think we get a good idea of the internals of ImageMagick and GIF processing now. Let’s get back on track.
Taking what we learned together and trying it with a real color palette!
Luckily, the My Little Pony community is very autistic like me, so I can already find all the color values I need for the character Starlight Glimmer well documented well except for the teeth and other details which are documented here.
So, let’s take all the values and create our perfect color palette (without forgetting Alpha):
convert xc:"none" xc:"#040004" xc:"#fcfff9" xc:"#fff8ff" xc:"#bfd4db" xc:"#9ae9db" xc:"#4d2b70" xc:"#843fb3" xc:"#67338c" xc:"#5e2e7b" xc:"#f2c7f6" xc:"#deb5e7" xc:"#c295d7" xc:"#b7bafb" xc:"#8883ee" xc:"#838aeb" xc:"#403099" xc:"#28dac5" xc:"#aaf8e1" xc:"#fffff0" xc:"#c368c9" +append palette_starlight_glimmer.pngOh god that was nerve wrecking to type out…
Those are 20 colors plus 1x alpha, so 21!
Based on everything we know now from experimenting, I’d try a simple remap with dithering disabled:
convert Starlight_Glimmer_Grin_Compressed.WEBP -dither None -remap palette_starlight_glimmer.png starlight_glimmer_remapped_nodither.gif
Aaaaand our remapped result looks similarly bad to when we simply told it to recompute 16 colors automatically. :D The eyes turned out a bit better and the mane a bit worse.
Let’s try to limit the colors to 21, hoping that ImageMagick will compute the correct ones, we then remap its approximation to our palette:
convert Starlight_Glimmer_Grin_Compressed.WEBP -colors 21 -dither None -remap palette_starlight_glimmer.png starlight_glimmer_remapped_nodither_c21.gif
This looks… worse? And I think I know why: The approximation it computes can of course not be perfect, and on top of that, I believe the eyes are actually a *gradient*, our simple color remapping won’t work with such limited colors if there’s an actual gradient involved.
The top result has the better eyes and teeth but the bottom result has the better mane and cutie mark on the bottom right.
So, my last shot at this is to limit it to 64 colors first, to compute approximate colors, to then remap those approximations to our hard limit map, in the hopes of getting a balance of these two results:

It does indeed balance things out! But the result is by no means perfect. I think the issue is that ImageMagick already does a decent job at creating a GIF that looks good to the human eye, meanwhile I’m trying to bend it into recreating a rasterized version of a perfect vector by cheating; it’s not designed to do this and while my idea may have been good, I can’t perfect it further without either applying more tricks or changing the algorithm.
I think for a holiday afternoon of playing with ImageMagick and trying to turn a crazy idea into an almost good result while being able to educate my readers a little bit is still not a bad thing!
So, I will leave it at that for now because I have to admit I’m sitting here and experimenting for way too long and need a break. I hope you learned something and enjoyed the curses. (:
PS Yes AI could have denoised this easily, but AI would have also needed a lot more compute power to do so; the point here was to use the brain and think for a bit and trying to find a solution using clever tricks, it didn’t quite work out as described above, for the reasons stated above, but the point here is to document the attempt in the hopes of it being useful as one can still learn from the attempt. (:
I run this blog in my free time, if this was useful or entertaining to you, consider donating a cup of coffee. :3
Remote Reply
Original Comment URL
Your Profile
@[email protected] That article easily made it into my personal favourites of your blog :starlight_happy::meowhuggies::ablobcatbongo::BlobCat_Flower: